Genuary 2025 Entries

I’ve submitted 8 entries (8 days) of Genuary 2025.

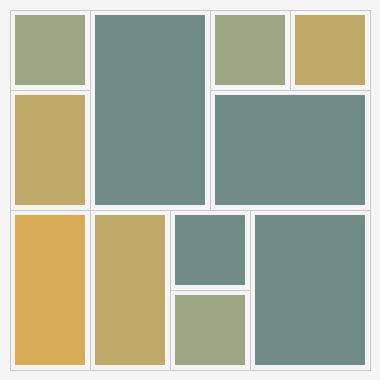
Day 1: Vertical or horizontal lines only.

Familiarize myself (again) with processing/p5.js. Use moving rectangles to achieve a cheap mesmerizing effect.

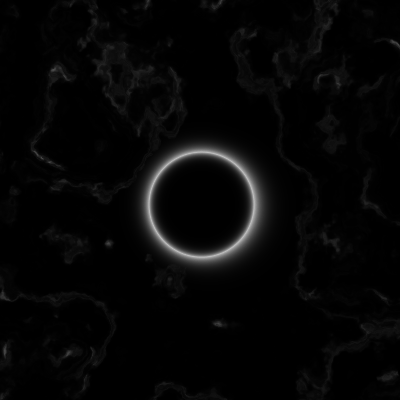
Day 4: Black on Black.

Also getting back to writing fragment shaders again. Simple and hopefully elegant effect.

Day 8: Draw one million of something.

I wouldn’t necessarily call this “art” but my first thought that is even close to “draw” and “1 million” is 1024×1024 pixels. To at least make it fun, I drew 1 million pixels running Conway’s Game of Life. The challenging part is to use two buffers to update upon each other interweavingly on Shadertoy.

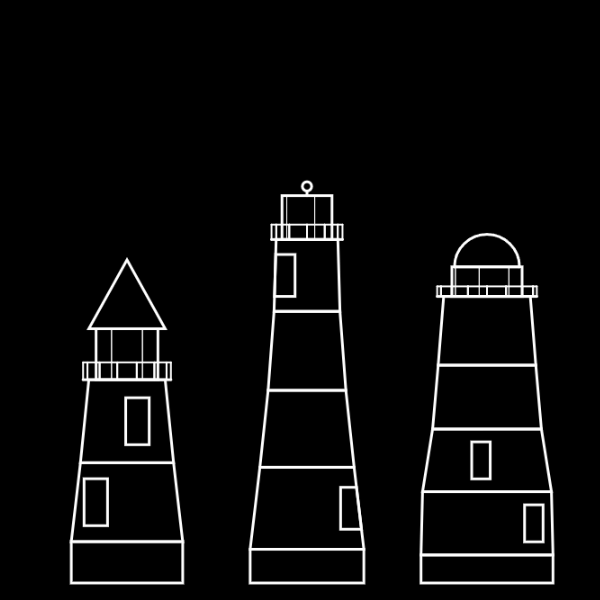
Day 20: Generative Architecture.

This is one of the most intriguing topics to me personally. However, I did not leave enough time that day to work on it. I ended up coding a very simple doodle-like lighthouse generator.

Day 21: Create a collision detection system (no libraries allowed).

I’ve previously written a positional-based dynamics (PDB) example in p5.js. It was a toy with only 2-point distance constraint. I’ve added collision constraints to it and made an entry. Again, I spent almost 5 hours making it right. It looks good, but not very artsy.

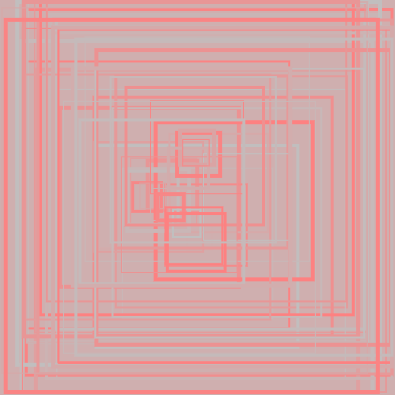
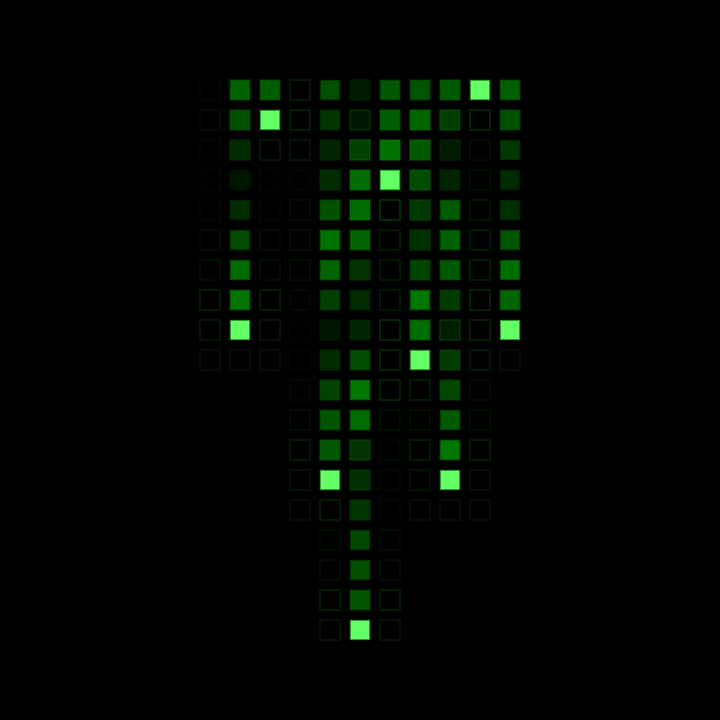
Day 29: Grid-based graphic design.

I decided to make a simpler one and mimicked the effect from The Matrix.

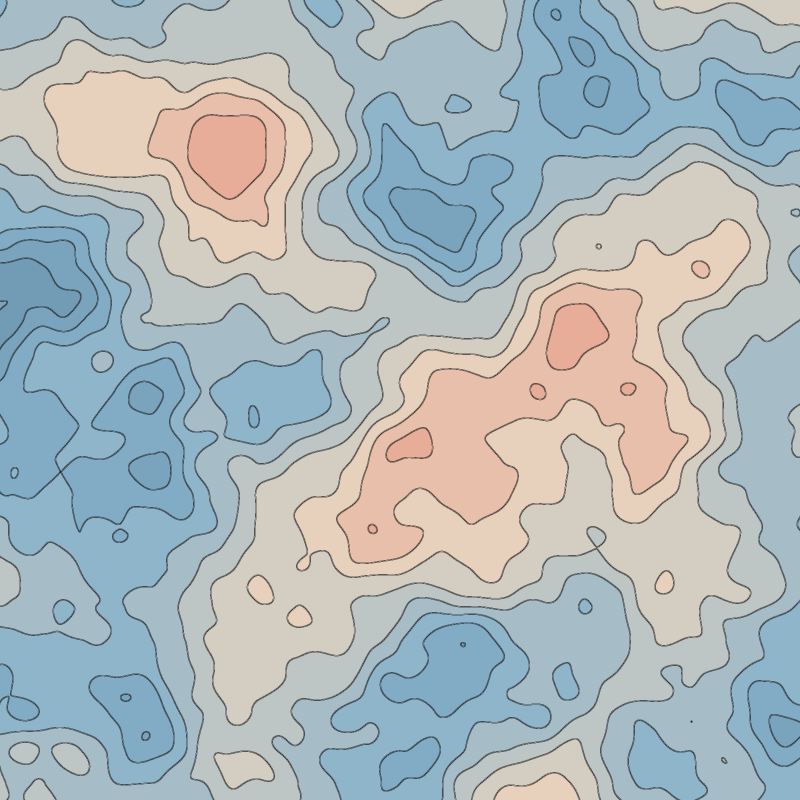
Day 30: Abstract map.

This is arguably the most artsy one. It immediately came to me that FBM (Fractal Brownian Motion) generates nice map-looking noise, and to make it a height map I only need to perform edge detection on it. Choosing the color palette took me longest time.

Day 31: Pixel sorting.

The only entry written in Python because I can operate on an image easily. I sorted different pictures with different ranking functions, but nothing looked well. Then I searched for some pixel sorting artworks online. Adding a width to the sorting area (sort for a small slice that is 3-6 pixels wide and change the sorting algorithm for the next slice) just clicks.

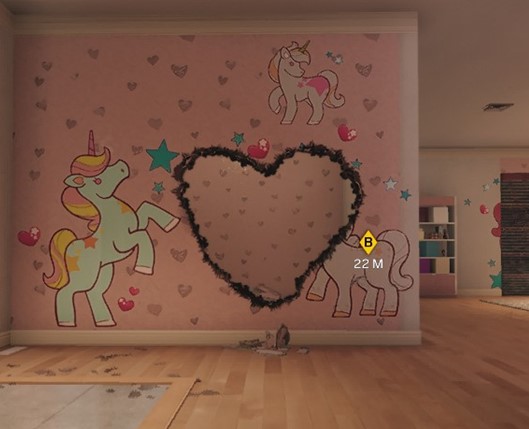
The honorable mention Day 7: Use software that is not intended to create art or images.

This does not count. Not for the reason I don’t consider it art, but because there’s nothing generative :D. In case you don’t know, this is a screenshot of a torched heart from Rainbow Six: Siege. (I burnt it. At least it’s original.)

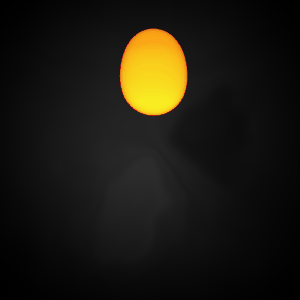
The unfinished Day 11: Impossible day – Try to do something that feels impossible for you to do. Maybe it is impossible. Maybe it’s too ambitious. Maybe it’s something you know nothing about how to accomplish.

In Genuary 2024, the theme for day 12 was “Lava Lamp”. I tried mimicking the effect of this video and did not succeed: https://www.youtube.com/watch?v=h_lQ2tMgLVM

This year I tried so many different ways to achieve it but can’t even get close aesthetically. Also, I believe some of my implementations (ray tracing, voxel cone tracing) were wrong. I ended up simulate it with some SDF balls with trigonometric functions. Lava lamp effect is officially my rendering holy grail right now.

Not the most well-written one but so far, the best looking one. (Speed up version).

That concludes for my Genuary 2025 journey. Happy February.

Me January

Programming language of choice: C++

Reason: I really wanna explore Rust, Go and Haskell. But because of a new work requirement, I need to ramp up on writing C++ professionally.

Topics to explore:

  • Procedural Content Generation
  • C++ at Large Scale
  • Arma3 Level Editor
  • do-calculus and counterfactual (almost done)

AWS Enclave & KMS

AWS Enclave is a type of VM whose host machine cannot access its memory. The host machine can only use certain APIs that’s provided by an enclave via vsock. This secure feature is provided by AWS Nitro System, therefore an enclave has to run on a Nitro-based EC2 instance. Also, an enclave image is built upon a docker image with aws nitro-cli.

Other than secure from host machine, a running enclave instance can generate attestation document that can somehow (I’m planning to dig deep in later posts) be verified by AWS services like its key management service (AWS KMS), so an enclave can use kms:decrypt without exposing any encryption/decryption details to host machine.

Think about the following scenario: you have a web service and wants to distribute a client library, and you need to make sure your web service only communicate to the client you distribute to. Or, only your client can understand the response.

If you haven’t seen the difficulties in this problem, hint: how can you prevent the host intercepting your http (even https) to get the messages and poke the memory of your client to get the secret, then make a fake (probably malicious) client to cheat?

AWS Enclave provides a solution like this:

  • use a secret to encrypt all messages
  • store the secret inside your client, so your client can decrypt the messages
  • distribute your feature inside a enclave image, so your user cannot access the secret from memory
  • decrypt with a service that can check the validity of enclave attestation document
    1. you may decrypt with kms:decrypt and setup key policy to automate attestation
    2. you may implement your own attestation and let the client load the key on start

Next part is my following the code to find corresponding APIs in the sample enclave-kms project. May be too detailed and not so interesting. If you are ready click ‘Page 2’ (WordPress never failed to surprise me).

Understanding Position-Based Dynamics

This post will be my notes on PDB study and will only include points I feel note-worthy. It is by no means a well-rounded tutorial. Btw I learned the principals from this online course: https://www.youtube.com/watch?v=fH3VW9SaQ_c (kudos)

Along with the note I’ll implement the distance constraint to illustrate how it works.

Reminders

  • PBD does not even try to simulate actual physics. It only looks good. All physics ‘references’ (for example, so-called momentum conservation) are attempts to make the scene look real.
  • PDB algorithm is a constraint solver. The algorithm introduced in the course is one-constraint-a-time, Gauss-Seidel method.

Math Review

  • Gauss-Seidel updates proposed values during iteration
  • Jacobi updates values only after each iteration (symmetrical?)

PBD Loop

before mainloop, all vertices should be assigned an initial position x_i, velocity v_i and invert-mass w_i (1/m_i).

  1. for each vert i, update proposed velocity v_i = v_i + t * w_i * external_force_i
  2. damp velocities. a simple way is times 0.99
  3. for each vert i, update proposed position p_i = x_i + t * v_i
  4. for each vert i, detect collection and generate collision constraints x_i -> p_i
  5. solve constraints – it’s numerical solver, so here will be an inner loop
  6. for each vert i, finalize velocity v_i to be actual velocity (p_i – x_i) / t
  7. for each vert i, finalize position x_i to be p_i

Cheatsheet

Distance constraint
C(p_i, p_j) = |p_i, p_j| - d
(look carefully you will notice it is not Hooke's law)

For constraint C(p1, p2), with invert mass of w1, w2 respectively,
Gradient of p1: (p1-p2)/|p1-p2|
Gradient of p2: (p2-p1)/|p2-p1|
Update of p1: -w1/(w1+w2)*(|p1-p2|-d)*(p1-p2)/|p1-p2|
Update of p2: +w2/(w1+w2)*(|p1-p2|-d)*(p1-p2)/|p1-p2|

Code

GitHub Gist: https://gist.github.com/stormouse/90a8d22582ad4e9bc6c91c4a5f80e842

https://editor.p5js.org/stormouse/present/lbMzg3OsY

Research: Indoor CQC Map Generation (1)

Objective: write an algorithm that can create a floor plan (single story) that is reasonable enough to be used as a top-down close quarter combat (CQC) game map.

I don’t know how to do it yet, so I’d study some basic floorplan design principles. The remaining of the article would be my notes watching this video.


Inputs

  • Size of the floorplan
  • Number of stories
  • Single/Multi-family
  • Number of each type of rooms, also garage
  • Thickness of external/internal walls

Features of Space/Room

Y/S/N – Yes/Semi/No

  • Sqft needs (Y/S/N)
  • Adjacencies (list of room references, immediate or not)
  • Public access (Y/S/N)
  • Daylight/Views (Y/S/N)
  • Acoustical privacy (Y/S/N)
  • Plumbing (Y/S/N)
  • Special equipment (DW, MW, Refri…)

Macro Constraint Solving

  1. Fill in the features of each unary feature (anything other than adjacency) with average value + variation
  2. Create a few reasonble and strict requirements on adjacency
  3. Constraint solving on adjacency
  4. Generate Relationship-Diagram (9:08 in the video)

Grouping by Constraints

  1. Group rooms by their features. (e.g. kitchen+living room + dining room since none of them requires privacy)
  2. Place rooms in different directions and makes it somewhat reasonable.

Abstract Floor Plan

  1. Follow the grouping result, draw circles of correct scale with respect to the actual space requirement, at the approximate place we planned earlier.
  2. Ensure each “connected component” is pure, rather than mixed with private and non-private.
  3. Set daylight direction and try to satisfy lighting/view requirements.
  4. Resolve adjacency problems by not allowing adjacency edges to cross. (How)

Bubble Diagram

Draw bubbles (fat circles just like in the abstract floor plan) and make them fit.

Block Diagram

Growing bubbles and make them squarer. Okay to leave some space in between squares as hallways.

(How to make things align though?)

Figure out room sizes

Tip: sum of furniture area + circulation room ~= final room size

Ideas: pre-make furniture assets so save some difficulty generating furnitures.

Open Correct Doors

  • Open correct doors according to the adjacency map.
  • Make sure every room can be accessed
  • Special restrictions for bathroom
  • Keep doors away from beds, toilets, desks

Walls

  • Pluming walls
  • Exterior walls
  • Seperating walls
  • No walls (Imaginary walls that’s removed with common sense, e.g. living & dining & kitchen)
  • Half walls (Shelves or anything that works as a half-separation)

UNet Multiple Character Solution

(This post is originally from the wiki I wrote for my recent game project Runner or Dinnerhttps://github.com/stormouse/horror-story-alpha/wiki/UNet-Multiple-Character-Solution)

Dead ends

  • Add components according to the character type after a playerPrefab is spawned: Unity does not support adding NetworkBehaviour to a spawned GameObject
  • Bind every possible component to playerPrefab and disable some of them according to the character type: Too hard to organize component relationships on that prefab. Dirty component references.

Solution

Unreal Method

Let playerPrefab be a ‘player controller’,and the characters are Pawns/Characters in Unreal concepts. A player controller can possess a character.

Pros: this method is universal, easily comprehensible, fully-controlled

Cons: you have to implement possess, and native helper components like NetworkTransform and NetworkAnimator cannot help you anymore.

P.S: I haven’t think over how to implement this feature, will research on Unreal’s implementation further.

Spawn-time Replacement (Our Way!)

If your game has a lobby scene, a traditional way to share information between lobbyPlayer and gamePlayer is to customize OnLobbyServerSceneLoadedForPlayer

// class NetworkLobbyPlayer
public override bool OnLobbyServerSceneLoadedForPlayer(GameObject lobbyPlayer,
                                                       GameObject gamePlayer);

This callback runs when the server notices a client has finished loading game scene. By default it spawns a game player prefab and transfer the control from lobbyPlayer to gamePlayer. But we can ignore the existing gamePlayer and create a new character for this client, which requires ReplacePlayerForConnection

public static bool ReplacePlayerForConnection(Networking.NetworkConnection conn,
                                              GameObject player, 
                                              short playerControllerId);

From server’s view, clients are just connections. We can get a client’s connection from a NetworkIdentity that is spawned for that client, for us that is, the lobbyPlayer.

var clientConn = lobbyPlayer.GetComponent<NetworkIdentity>().connectionToClient;

Then we spawn a new character prefab for the client to ‘possess’.

// instantiate on server side
var newPlayer = Instantiate(characterPrefab);

// tell all clients to spawn (auto-synced)
NetworkServer.Spawn(newPlayer);

// destroy auto-created gamePlayer                      
NetworkServer.Destroy(gamePlayer);

No need to worry about synchronization problem. The Spawn method of NetworkServer will ensure that every client scene will create a same copy when they are ready.

Finally, we return false for OnLobbyServerSceneLoadedForPlayer to prevent transfer of player control, because we have destroyed the game player and given the control to newPlayer by replacement.

How to Build a Heatmap for Tactic AI : Attempt 2

After a little bit more thinking I changed the propagation function from

Heat(neighbor) += Heat(this) * decay / numberOfOpenNeighbors

to

Heat(neighbor) = Max(Heat(neighbor), Heat(this) - numOpenNeighbors * decay)

And now the decay factor is the valve for linear decreasing speed.

Intuitively you can see the ‘heat’ is decreasing linearly relative to ‘distance’ from heat source. But remember, we want a 1/distance^2 like curve for it, therefore we apply a post-processing step to the temperature we got for each grid. That is:

(1) Distance(grid) = Heat(source) - Heat(grid)
(2) Factor(grid) = 1 / (Distance(grid) * Distance(grid) + 1)
(3) Factor(grid) = Factor(grid) - 1 / (Heat(source) * Heat(source) + 1)
(4) Heat(grid) = Heat(source) * Factor(grid)

By applying step (2), we generated a 1/distance^2 like function. (The +1 term on the denominator is to avoid divide by zero at source point.) But you can see that even a grid originally with Heat = 0 will be assigned with a positive factor. Step (3) is responsible for eliminating those residues.

Here I present the test results:

Compared with the result of last post, the result of this new mathematical model yields more reasonable area of influence, as well as easier-to-tune heatmap parameters.

Hope it helps you somehow!

PS: this algorithm takes 1~2 ms to run on my Unity3D scene, with grid map size ~60*40, which is acceptable for my current need, but not as good as expected. Later post I might talk about my experiments on optimizing the algorithm.


How to Build a Heatmap for Tactic AI : Attempt 1

I’ve been doing experiments on game AI, tactic team AI to be specific. And currently I’m looking forward to make use of a heatmap.

My idea is to make a grid map and assign heat value (or temperature) on grids so that it represents value of some property that can be reasoned about by an agent. An example would be to represent the potential danger. Think of a group of defenders who wants to defend a room with two entrance from waves of zombies. The area close to the two entrances are most dangerous, therefore have highest temperature in the heatmap. In addition to those two points, places nearby should also be ranked more dangerous than any other places. And a corner of the room could be a safer place to hold (although it’s not always true).

However I’d like the heatmap to have some extra characteristics. Namely, I want the emission of the heat satisfy this constraint:

The narrower the space is, the harder for the heat to go away.

It makes sense because it’s most dangerous if you are trapped in a small cage or a narrow corridor with a ruthless zombie than in a open space, where you can run and turn freely.

My first implementation attempt is to use Breadth-First Search to spread the heat and decrease the energy as it goes farther and farther. And to satisfy the requirement above, I made the decrease factor negatively related to the number of open spaces (neighbor grid without obstacles) next to a grid. For instance, let’s say first there’s a heat source somewhere in the grid field, and 5 out of it’s 8 neighbors are obstacles. And those 3 open neighbors will share all the energy the heat source emits. On the other hand, if all 8 neighbors of some heat source are open, the heat emit will be evenly distributed among them, therefore each neighbor receives less energy.

Intuitively this method tends to keep energy in small room and makes heat in narrow hallways to travel further before the energy becomes insignificant, than in a wide open space. However, the experiment didn’t work out well.

In the experiment I use the number of grids a heat source can influence to indicate whether this model makes sense. In common sense, a heat source with the same initial energy should influence same number of grids regardless of geometry, assuming the obstacles are made of insulation materials. But this naive model cannot guarantee it. Also, exponentially decreasing energy feels wrong. You can see the results from the image below. (Depth of green-ish color indicates the energy. Two heat sources are on the same row, different columns of the field)

exponential_decreasing_by_open_neighbors
Heat in narrow spaces does influence further, but the area of influence is unproportional.

Next step I’ll figure out how to preserve the area of influence on any geometry, and try to invite some 1/distance^2 like factor into the function because it feels more natural.